A Guide to Tampa International Airport (KTPA)
Welcome to Tampa! This time, we are going to the airport exit for the long term parking garage!
If you are taking SR 60 west or SR 589 north, use the left two lanes. Airport drivers: use the two middle lanes for TPA Airport! For Spruce Street (SR 616), exit right.
Welcome to Tampa International Airport! Because you are on airport property, all of the signs change colors and fonts.
Coming up on your left is access to the rental car facilities, along with economy parking for vehicles over 7 feet 10 inches, and the main post office. Keep right to access the terminal's parking lots.
Choose wisely about your destination in the airport! For rental cars, economy parking, and the US Post Office, exit to the left. We are going to the airport parking lot, so no need to exit here!
Westbound traffic from Spruce Street (SR 616) joins the airport roads for the first set of signs showing the airlines served by the Red Terminal areas.
Second sign for additional airlines in the Red Terminal.
The blue/red markers were made by Jane Davis Doggett in 1971, when the new terminal opened.
The Blue Terminal signs follow, showing the airlines served by the south terminal which is located on levels 1 to 3 at the airport.
The final set of blue signs on the George J. Bean Parkway looking in the northbound direction.
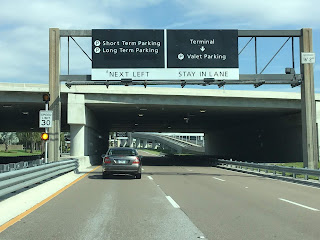
A part of one of the airport runways span the parkway ahead of the ramp to parking. For access to the terminal, stay in your lane.
A look at the separation between the parking and terminal roads. If traffic is congested at the airport, then all message signs will say HEAVY TRAFFIC, DO NOT CIRCLE.
A flyover carries traffic to northbound George J. Bean Parkway as the parking ramps separate into short term and long term respectively.

Looking at the separation between odd and even numbered floor levels from the ticket station for parking.
A right hand merge lane forms for the other long term entrance into the odd-numbered floors of parking.
Located in the parking garage, is a warning sign for drivers that says to park in marked spaces only. Another ramp takes you up two floors from the level that you are currently on.
Now that we have parked in our parking spot, here is a look at aisle 309 on level 3 in the purple section.
Overhead signs for the Wright Brothers elevators located to the right, and another for the exit.
The purple elevators are straight ahead at the end of aisle 310.
And here are the elevators! I am going to access the airport's monorail, which is located on level 7.
A real-time map showing where the five monorails are located. In this case, the nearest one is located at the Wright Brothers station.
Let's enter the monorail to the main terminal! These monorails were installed in 1991, and are completely computer controlled.
Now we are inside the monorail, and entering the Robert Goddard station.
Leaving the Lindbergh station and entering the Earhart station.
The inside of one of the monorails to the parking garages and the main terminal.
Leaving the Amelia Earhart station and going to the Charles Yeager station.
Now we have exited the monorail and heading for the main terminal! The elevators are straight ahead.
Let's take this elevator down to level 1 for SkyConnect access!
Once you are inside the elevator, you can look at the directory in black to know which floor that you parked on, and for the terminal floors.
Here is level 1, the baggage claim area! You cannot proceed directly from red to blue once you get off the elevator. To cross from red to blue, go up to level 2 and cross the lobby.
Access to rental cars and economy parking via the SkyConnect is straight ahead, along with belts 14 and 15.
An example of a baggage claim belt used for Southwest Airlines flights.
Escalator access to the SkyConnect is on your left. Elevator access to the SkyConnect is going to be steps away!
Approaching the red elevators, we can see signs for the taxis and shuttles, along with another for the elevators.
Here is level 4, access to SkyConnect! There are three sets of elevators for each color, red and blue. There is also a flight information display for arriving and departing flights.
Let's take the SkyConnect to the rental car station! Each train operates from one to five minute intervals, depending on your location.
This train is bound for the Economy Parking station.
This is the Economy Parking station, with access to two SkyConnect trains and elevators to level 1 of the garage. If you want to go to the main terminal without making a stop at the Rental Car Center, transfer here.
Now approaching the final stop of the SkyConnect, the Rental Car Center!
After a 5 minute ride on the SkyConnect, here is the Rental Car Center! The first two counters that you see are National Car Rental and Alamo Rent-a-Car.
The SkyConnect train leaving the Rental Car Center. Includes the doors closing.
This is the halfway point from the north core and the south core. The final three rental car counters are to the left.
Now approaching the south core of the rental car facilities, we are going to go down to level 1!
This door leads you to where you can pick up a rental car directly from the airport.
A quick look at the rental car drop off area.
Straight ahead is elevator and escalator access to the SkyConnect!
One final picture of level 1 before we go up the escalators.
This escalator takes you from level 1 to level 4 for SkyConnect access.
You can even see one of the elevator banks directly from these escalators!
This is the South Core, looking northbound. Access to the SkyConnect is on your left. Not shown here is remote bag check.
Our final look at the rental car stations before we jump on the SkyConnect.
The SkyConnect logo, as seen from the Rental Car Center.
This set of elevators takes you down to public transportation.
Construction for the airport's Phase 2 project, that is expected to be completed in the mid-2020's.
Let's board the SkyConnect, and take the train to the main terminal!
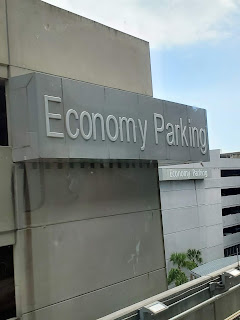
A look at the Economy Parking garage from the SkyConnect.
One of two economy parking signs. The garage was completed in 2005.
This is the main terminal station at the SkyConnect. Escalators and elevators are the only methods of transport while at this station.
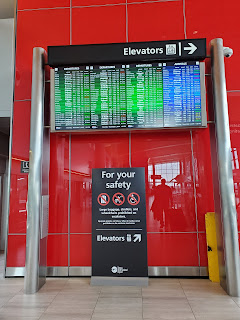
A flight information board and a sign for the elevators to the right. Large luggage, strollers, and wheelchairs are not allowed on the escalators.
Back at level 1, here is a look at baggage belt 14, and the architecture at the airport.
Straight ahead is access to baggage belts 9 to 13, and the men's bathrooms. Also straight ahead are the Red South Elevators.
The Red South Elevators, which takes you to one of the terminal levels, and access to Short Term Parking levels 4 to 9. Named after Igor Sikorsky.
Level 2 of the terminal, as seen from leaving the elevators.
TPA also offers an interactive information screen, where you can tap on one of the following buttons.
Level 2, approaching one of the airline ticket counters and escalators. We will be making a right turn to access level 3.
Airline ticket counters for Alaska Air, British Airways, and Silver Airlines are to your right. All other ticket counters are straight ahead.
I took this photo specifically for one of the airline ticket counters that serve American Airlines from this vantage point.
An example of an overhead sign at the airport, this one is for baggage belts 9 to 15, and ground transportation access.
Here is level 3, also known as the transfer level! This is one of the directories that you would see from outside the elevators.
For access to Airside A and Airside C, along with gates 1 to 45, turn right. Otherwise, look at this flight tracker.
Turning left, we can see the airport's dining area and a part of an airside.
Airside F serves all international flights via Swoop Air, Air Transat, and Westjet.
Need to go down to level 1? Use this escalator for access to belts 9 to 15 in the red baggage claim area.
Another flight information board, with a sign for airside E and F, which serve gates 62 to 90.
Two overhead signs at the airport's level 3. This is for gates E62 to E75, and gates F76 to F90. The other sign is for the hotel and a public telephone.
Did you know that the airport even has it's own Marriott hotel, complete with airport access?
A quick peek inside the Marriott hotel at Tampa International Airport.
This is a model of what Tampa International Airport looks like currently.
TPA in 1971.
TPA in the 1980's and 1990's.

And now for the 2030's as a part of the 2012 Master Plan! A model of what the future TPA will look like is shown below.
A model of what TPA will look like in the 2030's.
Now leaving the airport's Marriott hotel for another look at level 3 of the airport!
Going up to level 9 via the Charles Yeager elevators.
Did you know that there is a bit of history of a specific person or similar things while you are on the elevator?
Charles Yeager got past the sound barrier while flying his Bell X-1 on October 14, 1947.
Ready for some views of the airport and the parking garage while on level 9? Here is one of them!
From this vantage point, you can see the air traffic control tower, and the airport's Marriott (the circle shaped building) while you are on level 9. Everything is quiet except when an airplane turns on!
A look at Red Departure Drive and one of the airsides, complete with one of the monorail tracks. Effective October 24th, 2019, you cannot walk on the tracks because the doors are used for emergencies only.
Looking downward towards Red Departure Drive.
Construction at Tampa International Airport. This is for the demolition of the old red side rental car garage to make way for phase 2.
The top of the airside building, and the down ramps at one of the parking garages are shown here.
Our final view at the top of level 9, with the control tower in the background.
Now we are about to take these elevators down to level 5 to access the monorails to parking!
The Charles Yeager elevators serve the following airlines and for the airport hotel.
Let's enter through these doors to be able to go down four floors!
There are a total of 6 elevators in each red or blue section at Tampa International Airport. You can even watch the floor progress for each elevator right above the call buttons! The black spot used to be an analog clock before all of them were permanently removed earlier this year.
This is level 5, access to valet parking and the monorails to long term parking.
The monorail's map as seen before you enter. The arrows are actually placed backwards, as the monorails do not go directly to the Earhart elevators first. The monorails go to the Armstrong elevators, followed by the long term elevators, and then makes a circle to access the main terminal elevators.
The next monorail will arrive in 49 seconds. The nearest monorail was stopped at the Earhart station.
Let's enter through these doors to magically transport to the purple parking lot!
And here we are in the purple section of long term parking! Now let's find our way out!
Follow all signs that say Out to head for the exit. If you are parking in Wright Brothers or Charles Lindbergh, turn right.
To pay for airport parking, turn right at the exit sign. Airport parking is free for the first hour, and then prices start to increase.
After you go down any number of floors, you are greeted with the pay station. The SunPass lanes are used only if you have Easy Pay turned on. If you have a ticket, do not use the SunPass lanes! Instead, look for signs that say UNDER 1 HOUR, CASHIER, or CREDIT ONLY.
The airport exit ramp was installed around 2014 as a new way to exit the airport without circling around the airport's access road. For return access to parking, keep right.
Now that we have exited the pay station, here we are back on the George J. Bean Parkway heading southbound! Return access to the terminal, access to rental cars, economy parking, and the cell phone lot is going to be on your left. Keep right for access to I-275, SR 60, and the Veterans Expressway (SR 589 north)
A left-side ramp departs for access to the terminal via the service road, along with the cell phone lot, rental car center, and the economy parking garage.
For access to the Veterans Expressway and SR 60 west, exit in the right lane as described on this sign.
Now that we have left airport property, the signs start to change back to highway standards. A right exit departs for SR 60 West and the Veterans Expressway. Keep left for access to I-275.
If you are going to PIE Airport or Saint Petersburg, use the left two lanes for I-275 South. There is no exit until Exit 32 (SR 687 to US 92 via 4th Street North). If you are going to Tampa, use the right two lanes for I-275 North, SR 616, or SR 60 East.
This ramp to SR 60 East provides access points to Cypress Street and Spruce Street (SR 616). Reduce your speed to 25 MPH as described on the sign!
Final opportunity to use the Cypress Street exit via the loop ramp. Access to Spruce Street (SR 616) and SR 60 East to I-275 is coming up, so be in either the left or right lane.
If you are heading to International Plaza, use Spruce Street. For Westshore Plaza, use I-275 North.


Comments
Post a Comment